kopimojo - The magic of coffee? At least that's what this blog space is called. But it has nothing to do with magic nor coffee, truth to tell all cool blogspot names were already taken. So it is just another name.
I will try to share my hobby esp32/esp8266 micropython projects experience here though. So hello and welcome and I hope it will be enjoyable and useful for both of us.
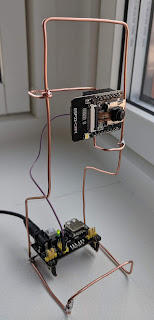
I will be making my circuits in freeform, just for fun and making these projects artsy. I am sorry if they look ugly. I managed to set up a practical freeform wire-frame for esp32-cam today.
Yes I know, it is ugly. It was my first try and I think it went out alright. The copper wire frame is connected to the ground. The two negative rails of the MB102 breadboard power supply module were first connected to the bottom part of the frame, then the two ground pins of the esp32-cam. I soldered female pin headers to the copper wire frame. The components were slotted into these female pin headers. Replacing components is easy.
Lastly using a jumper wire to connect 3.3V from the MB102 to 3.3V pin of the esp32-cam. That's it, we are done.
With only to components soldered to a copper wire frame acting as a camera stand and as the ground rail of my circuit, I managed to have a practical webcam setup.


Comments
Post a Comment